
What You Need (Click for links):
3" Ribbon - approx. 10 inches
3/8" Ribbon & other misc. trim you can find in craft stores
Your clip of choice ~ We typically offer up alligator clips, french barrettes, and pony-o's for our customers
TOOLS: Needle & Thread (we like to use upholstery or buttons/craft), lighter to heat seal, fabric scissors, & a salon clip OR two double prong alligator clips (optional)
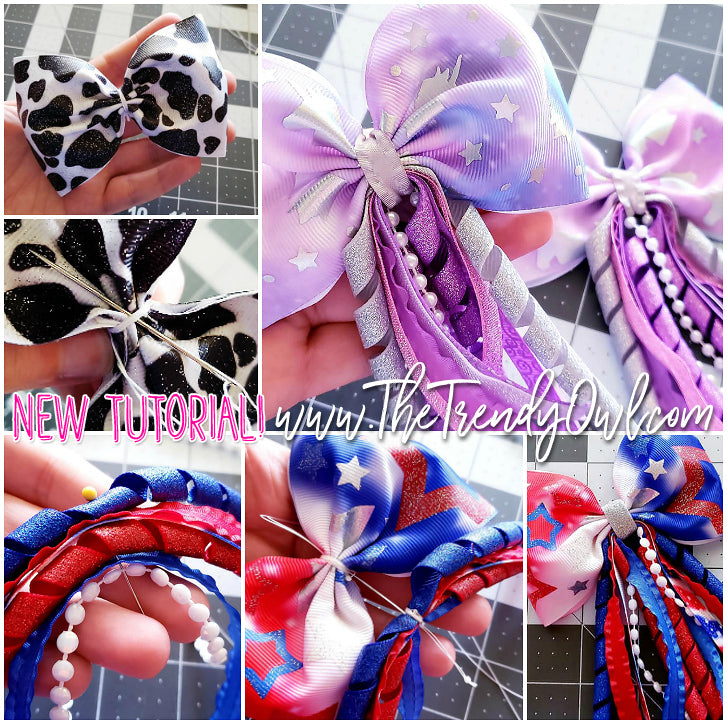
First, the bow!
3/8" Ribbon & other misc. trim you can find in craft stores
Your clip of choice ~ We typically offer up alligator clips, french barrettes, and pony-o's for our customers
TOOLS: Needle & Thread (we like to use upholstery or buttons/craft), lighter to heat seal, fabric scissors, & a salon clip OR two double prong alligator clips (optional)
First, the bow!

Step 1: Cut approx. 10" of your 3" ribbon. Run a lighter over the edges to heat seal them & prevent fraying

Step 2: Fold ribbon in half and press to make a crease/line in the middle.

Step 2: Fold ribbon in half and press to make a crease/line in the middle.
 Step 3: Bring the outer edges together so that they overlap about 1/2". Do this in a way that the back side of the ribbon is on the inside of your loop and the front/top side is facing out.
Step 4: Bring your middle crease up to meet the center of your overlap so that the circle is not flat. I like to use 2 clips (one on each end) at this step to hold the ribbons in place so that my hands are free to check that we have the exact center. If one of your sides looks bigger than the other, you can pull from the other to get it to even out more.

Step 5: Time for stitching! Double up your thread & knot the end. The way you make the stitches greatly impacts the creasing of your finished bow so take your time with this part! From the top side (with the overlapped edges being on the back), insert your needle about 1/4" of the way from the bottom of the bow. Weave through in even stitching so that you will have three stitches of thread showing on top. Make sure the last stitch you make is one from the backside to the top/front. Basically, just like the picture!

Step 6: Take off your clips and bring the thread around from the back and string it through the gap at your knot. If your knot is flush with the ribbon, simply tug on it a bit to get access.


Step 7: Continue to pull the thread through until there is no slack left. Grab the thead at the top of the bow and pull. When you do this, the bottom half of the bow will cinch up. Next, pull the rest of the thread through the bottom.

Step 8: Wrap the thread around the center of the bow 3-4 times and then secure with 2 knots at the back side of the bow and you're done!

From here you can take 3/8" ribbon or trim and wrap the center and attach your clip to be done OR you can continue through the tutorial to add on cute streamers!!
Time for the streamers!!
I want to start by saying, there aren't any set measurements or amounts that are required -- It is all up to you (or your customers/girls) the length and amount of ribbons & dangles you add. I am simply sharing what I like to use and have found to work great :)

Step 1: Cut your pieces to approx. 7-8" in length and heat seal the edges to prevent fraying. I like to have about 6-7 different pieces in my streamers. In this set I used 2 korker ribbons, 1 regular print, 2 double ruffle ribbons, and 1 pearl strand.

Step 2: Decide how you want to arrange them and then one by one place them onto a pin in the center of the strip. If there is anything you can't puncture, save it until the end and don't worry about adding them into this step.
 Step 3: Wrap thread around the center, tie a knot or two and then I also like to wrap it a few more times to give it extra stability then cut the thread.This just helps everything stay put when you go to attach it to your bow.
 Step 3: Wrap thread around the center, tie a knot or two and then I also like to wrap it a few more times to give it extra stability then cut the thread.This just helps everything stay put when you go to attach it to your bow.
Step 4: With a new thread, push the needle through from the bottom to the top. Grab your classic bow (or whatever bow style you are attaching your streamers to) and push the needle straight through the center from the bottom to the top. You may need to use some pliers to pull your thread through if your layers are thick.


Step 5: Pull thread all the way through so that your streamers are flush with the bow then wrap both the bow & streamers together and secure with 2+ knots.
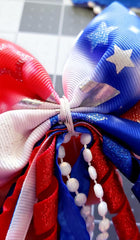

Step 6: Wrap the center of your bow with a piece 3/8" ribbon & attach your clip of choice, and you're done!!
Any questions?? Wanna share your pictures??
Feel free to join our VIP group on Facebook!!
Lucyopek
Error 212 [url=https://try.alexa.com/marketing-stack/competitor-keyword-matrix]origin is unreachable[/url]
ecoNom
Дабы не ошибиться с выбором, рекомендуется учитывать характеристики самого дачи (либо коттеджа), габариты участка земли.
Наша международная компания занимается не только лишь проектированием и сборкой, профессионалы дополнительно делают последующее сопровождение автономной канализации.
Септики – это несложная сборка с специфической конструкцией перелива, фильтрации и сложной электроникой
Всем известно, что профессионализм – это сегодня наиболее важное
Автономная канализация – наиболее востребованная часть технических коммуникаций
Jenlasock
по сути live roulette
[url=http://окносфера.СЂС„/main/10-provedenie-auditov.html]играть слоты лягушки[/url]
NeilaOl
[url=https://hqd.wiki/]жидкость hqd[/url]
электронная сигарета essentials
Mothfag
[url=https://hqd.wiki/]что означает если hqd мигает зеленым[/url]
купить электронные сигареты в энгельсе